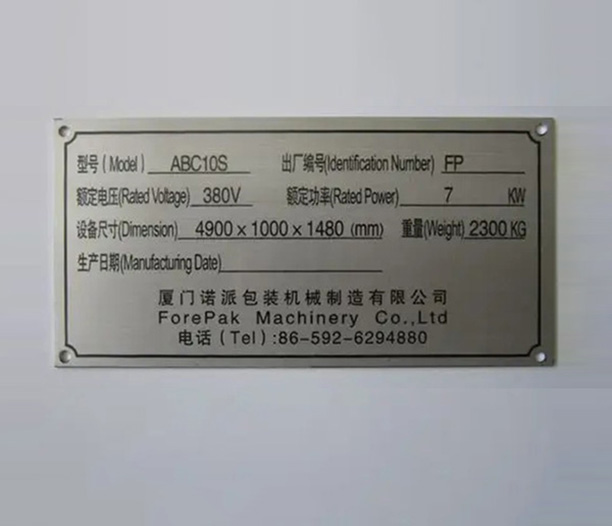
That metal plate on the side of your water heater is not just a decoration. It holds the key to understanding your appliance. The water heater nameplate is its permanent ID card and technical manual rolled into one.
Ignoring it can lead to wrong repairs, failed inspections, or buying an incompatible replacement. This information matters for homeowners, renters, and DIY enthusiasts alike.
Let’s break down what you can learn from this small but vital tag. Knowing how to read it saves time, money, and hassle.
What Is a Water Heater Nameplate?
A water heater nameplate is a metal or foil label permanently attached to the unit’s exterior. It’s usually found on the side, near the top. Sometimes it’s on the front panel.
Manufacturers affix it during production. It contains specific details that never change about that particular model. This differs from a warranty card or a user manual you might misplace.
Think of it as the heater’s birth certificate. It states its original specifications. These include its capacity, power requirements, and pressure limits. The nameplate remains relevant for the life of the appliance.
You’ll need to reference it for many tasks. Installation, troubleshooting, and replacement all start with the nameplate.
Why This Small Tag Is a Big Deal
You might wonder why a simple tag holds so much importance. The answer lies in safety and efficiency. The data on the nameplate ensures your unit operates as designed.
Installing a water heater without checking the nameplate is risky. Electrical or gas requirements might not match your home’s systems. This can create fire hazards or cause poor performance.
For repairs, the nameplate is your first stop. It gives you the exact model number. This allows you to find the correct replacement parts. Generic parts can cause malfunctions.
Local building codes also require permits and inspections for new installations. Inspectors will check the nameplate details against the installation work. They verify everything is up to standard. Without the nameplate, you might fail inspection.
Where to Find Your Water Heater’s Nameplate
Location is the first step. For most tank-style heaters, check the upper section on the side. Look near the piping and controls. It’s often on the front or side of the access panel for gas models.
On electric models, you might need to remove an upper access cover. The nameplate is usually mounted just behind it. For tankless units, it’s typically on the front or side panel.
The tag is meant to be visible for service. But years of dirt or paint can sometimes hide it. Give the area a gentle wipe with a damp cloth. Avoid harsh chemicals that could erase the stamped information.
If you truly cannot find it, check the original paperwork. The model number on your purchase receipt or manual will help. But the physical nameplate on the unit is the definitive source.
Decoding the Model and Serial Number
The model number is the most looked-for item on the water heater nameplate. It’s a code that tells the manufacturer the heater’s features. This string of letters and numbers follows a specific logic.
It can indicate the tank capacity, fuel type, recovery rate, and even the year of design. For example, a model starting with “FVR” might mean “Fast Recovery, Vertical, Residential.” Each brand has its own system.
The serial number is unique to your unit. It often encodes the manufacture date. This is crucial for determining the heater’s age. A typical code might have a letter for the month and numbers for the year.
Knowing the age helps you anticipate replacement. Most water heaters last 8-12 years. The serial number on the nameplate gives you a factual starting point, not a guess.
Understanding Capacity and First Hour Rating
The tank capacity is clearly listed on the nameplate. It’s measured in gallons. This tells you the physical amount of hot water the tank can hold.
But a more useful number is often the First Hour Rating (FHR). This is especially common on newer gas models. The FHR estimates how many gallons of hot water the heater can deliver in one hour, starting with a full tank.
It accounts for tank capacity plus the speed of reheating. A 40-gallon tank with a high recovery rate might have a 60-gallon FHR. This number helps you size a unit for your household’s peak usage.
When replacing a heater, don’t just match the tank size. Check the old nameplate for the FHR. Matching or exceeding it ensures your family won’t run out of hot water.
Voltage, Wattage, and Amp Specifications
For electric water heaters, the electrical specifications on the nameplate are critical. You will see the voltage (e.g., 240V), wattage (e.g., 4500W), and amperage.
These numbers must match your home’s circuit. A 240-volt heater cannot run on a 120-volt outlet. Installing it incorrectly can damage the unit and create an electrical hazard.
The wattage tells you the power consumption. Higher wattage elements heat water faster. The amperage determines the required breaker size. The nameplate will list the “Max. Amp Draw” or similar.
An electrician will always check the water heater nameplate before wiring. As a homeowner, you need this info when purchasing a new unit to ensure your electrical panel can handle it.
Gas Type and Input BTU Rating
Gas water heater nameplates have different key data. The most important is the fuel type: Natural Gas (NG) or Liquid Propane (LP). These systems are not interchangeable. Using the wrong gas type is extremely dangerous.
The nameplate will specify which gas the unit is designed for. Conversion kits exist, but they must be installed by a professional and the nameplate should be updated to reflect the change.
The other crucial number is the input BTU (British Thermal Unit) rating. This measures the burner’s heat output per hour. A higher BTU rating generally means faster recovery.
This rating must be appropriate for the venting system. Installing a high-BTU heater with an undersized vent can cause serious safety issues with carbon monoxide.
Pressure and Temperature Limits
Your water heater is a pressure vessel. The nameplate states its maximum allowable working pressure (MAWP). This is often 150 psi (pounds per square inch).
It also lists the relief valve temperature setting, usually 150°F. The Temperature and Pressure (T&P) relief valve is a critical safety device. It must be rated for these nameplate limits.
If your home’s water pressure exceeds the MAWP, you need a pressure-reducing valve. Ignoring these limits can stress the tank and increase the risk of failure.
These numbers remind you that the water heater is more than an appliance. It’s a piece of equipment that manages significant energy and pressure.
Energy Factor and Efficiency Information
Modern nameplates prominently feature the Energy Factor (EF). This number measures the overall efficiency of the unit. It considers recovery efficiency, standby losses, and cycling losses.
A higher EF (closer to 1.0) means a more efficient heater. Comparing EF ratings helps when shopping for a new, energy-saving model. The nameplate might also display a Uniform Energy Factor (UEF), a newer standard.
This section may also list insulation R-value. Higher R-value means better heat retention. This reduces the energy needed to keep water hot while the tank is idle.
Paying attention to these numbers on the nameplate can lead to substantial savings on your utility bills over the life of the heater.
Using the Nameplate for Installation and Replacement
The water heater nameplate is your guide for a correct installation. Before any work begins, compare its requirements to your home’s infrastructure.
Check the voltage, amperage, and breaker size for electric models. Verify gas type and venting requirements for gas models. Ensure the physical location can support the tank’s weight when full.
When replacing an old unit, take a photo of the old nameplate before disposal. This guarantees you have all the specs for buying the new one. It also helps if you need to match a specific height or connection layout.
A professional installer will not proceed without reviewing the nameplate. As a savvy homeowner, you should do the same to understand the work being done.
The Nameplate’s Role in Troubleshooting and Service
When your water heater acts up, the service technician’s first question is about the model number. This comes directly from the nameplate.
The model number leads to precise wiring diagrams, parts lists, and service bulletins. Telling a technician “it’s a 50-gallon electric heater” is not enough. The exact model from the nameplate is what they need.
If you’re troubleshooting yourself, the nameplate specs are your baseline. If the heater isn’t producing enough hot water, check its FHR against your usage. If it’s tripping a breaker, verify the amp draw against the breaker size.
The nameplate provides the facts you need to move from a vague complaint to a specific, solvable problem.
A Note on Safety Warnings and Certification Labels
Look closely at the water heater nameplate and the area around it. You’ll also see important safety warning labels and certification marks.
These might include “WARNING: Hot Water Can Scald” or cautions about flammable vapors. Certification marks from organizations like ANSI, UL, or CSA are crucial. They indicate the unit was tested to meet safety standards.
Never remove or paint over the nameplate or these labels. They are permanent parts of the appliance. Obscuring them can void warranties and create safety risks for future homeowners or technicians.
They are there for a reason. Respecting them is part of responsible home ownership.
Frequently Asked Questions About Water Heater Nameplates
Q1: What should I do if my water heater nameplate is too faded to read?
A1: First, try gentle cleaning with a damp cloth. If it’s unreadable, your best options are to find the original purchase documents, check for a duplicate label sometimes placed on the inner access panel, or contact a professional. A technician can often identify the model by internal components.
Q2: Is the installation date the same as the manufacture date on the nameplate?
A2: No, they are different. The serial number on the nameplate decodes the manufacture date. The installation date could be weeks, months, or even years later. You should record the installation date separately on the tank or in your home records.
Q3: Can I install a new water heater with a higher BTU or wattage than my old one if the tank size is the same?
A3: Not without verification. A higher BTU or wattage rating may require upgrades to gas supply lines, venting, or electrical circuits. Always check the new unit’s nameplate specifications against your home’s capacity before purchasing or installing.
Q4: My nameplate lists a pressure of 150 psi. My home’s water pressure is 80 psi. Is that okay?
A4: Yes, that is perfectly fine. The 150 psi on the nameplate is the maximum safe operating pressure. Your home’s pressure should be well below that, typically between 40-80 psi. If your home pressure is near or above 150 psi, you must install a pressure-reducing valve.
Q5: Why does the model number on my receipt not exactly match the one on the physical nameplate?
A5: Sometimes the receipt shows a “series” or retail model number, while the nameplate shows the more specific “engineering” model number with extra digits for manufacturing. The core part of the number is usually the same. The one on the physical nameplate is the one to use for parts and service.